Showing posts with label sewing. Show all posts

Wednesday, 21 August 2013

Doll nappy / diaper #2...quick 'n' easy project

So, you may remember that last year I blogged about a teeny weeny nappy (or diaper) for dolls...
As time goes by, I am acquiring a bit more experience with the sewing machine (as it is obvious) but also, I'm cutting corners to make the little time I have go a little further.
So, here it is a quicker and easier version of my tutorial to make a doll nappy.
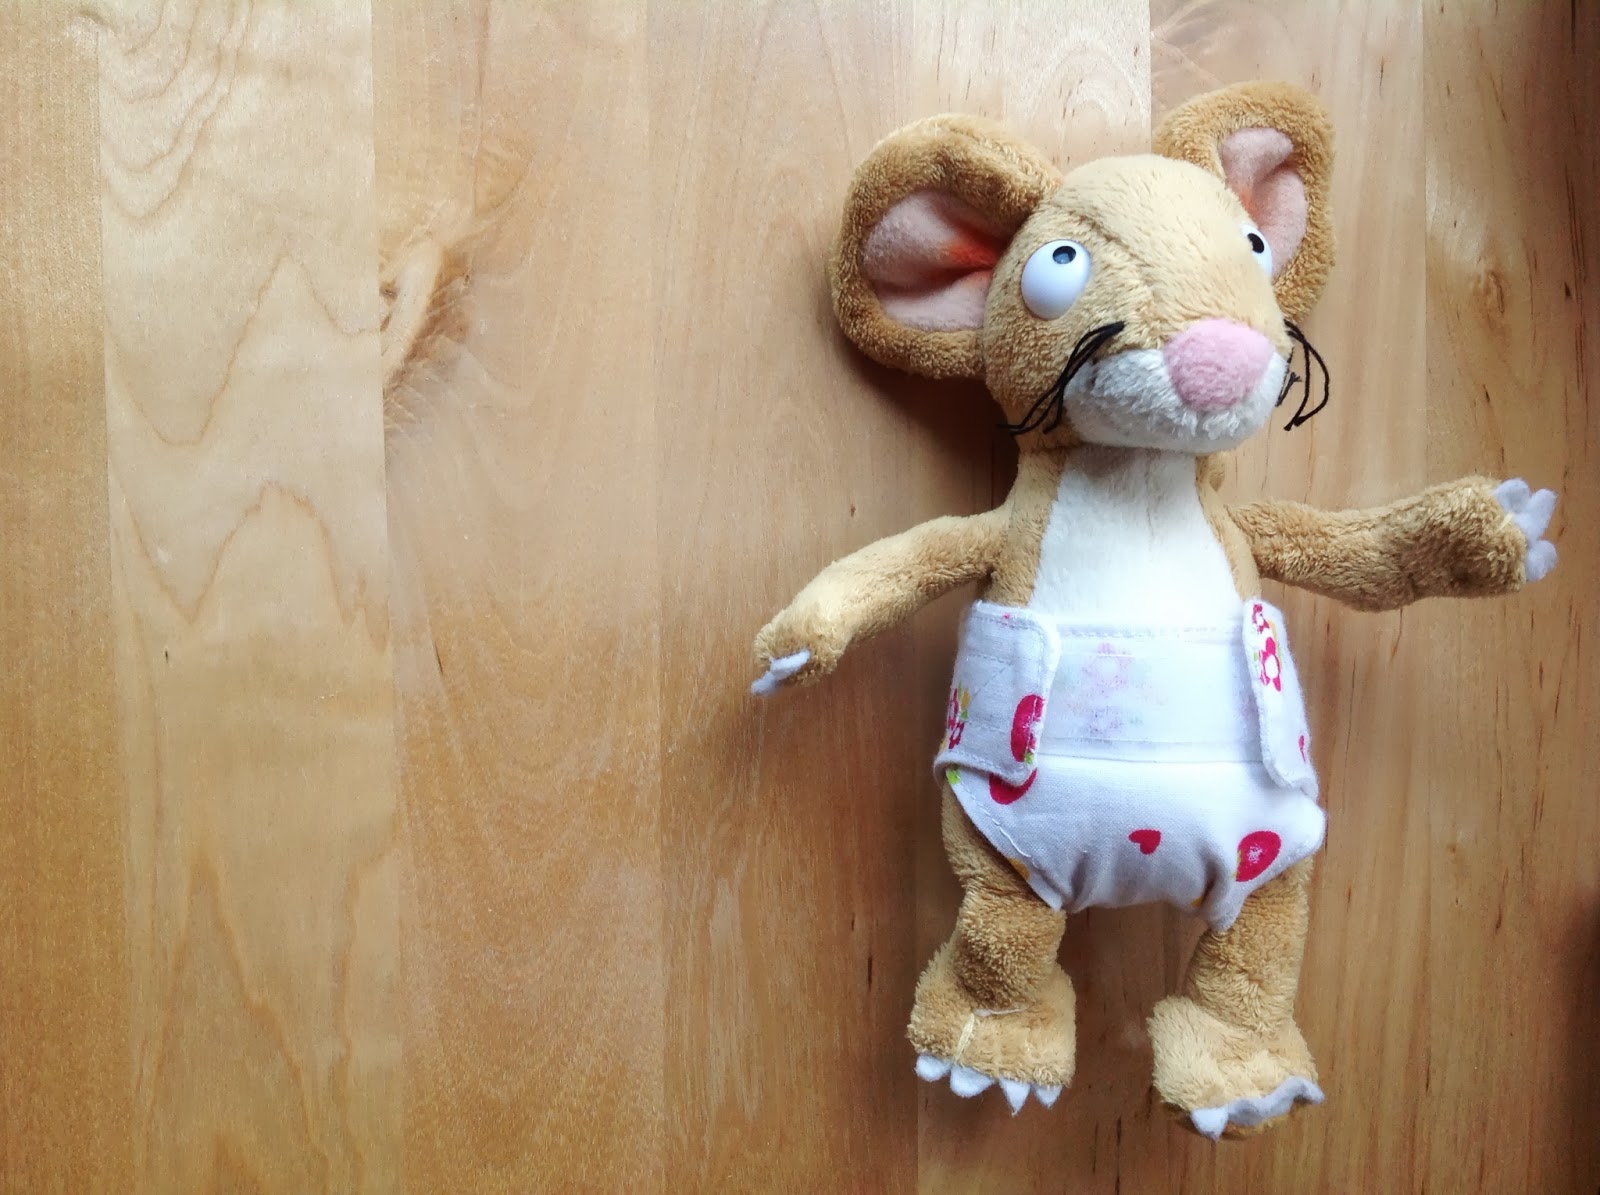
Who would have said that the brave little mouse needed a nappy????


These are the materials you'll need, slightly different from my previous tutorial :

Materials:
  • Old small bath towel (or a small piece of knitted fabric, easier to work with and less bulkier than towel. I've used an old baby bodysuit) - for the internal part of the nappy
  • A little cotton fabric of your choice - for the external part of the nappy
  • A strip of Velcro, 1 and a 1/2 time the length of the wider end of the nappy
  • a doll / teddy to put it on (please note: I based this on one of Little Miss' doll, which is long 26 cm head to toe and has a 22 cm waistline; if your doll / teddy is bigger / smaller you'll need to scale the measurements given to suit)
Follow the instruction in my previous tutorial to measure and cut yourself a paper template, according to your doll's size.

Cut the cotton fabric (for the external part of the nappy) following the paper template you have made.

Now, the easy bit: cut roughly a square of the knitted fabric, a bit bigger than the cotton fabric piece. Lay the cotton fabric on top of the knitted fabric WRONG sides together. Pin in place.


Sew the two piece of fabric together following the shape of the cotton fabric, using a zig-zag stitch (that would allow some elasticity and stretch to the nappy), leaving one of the short sides open for turning inside out.
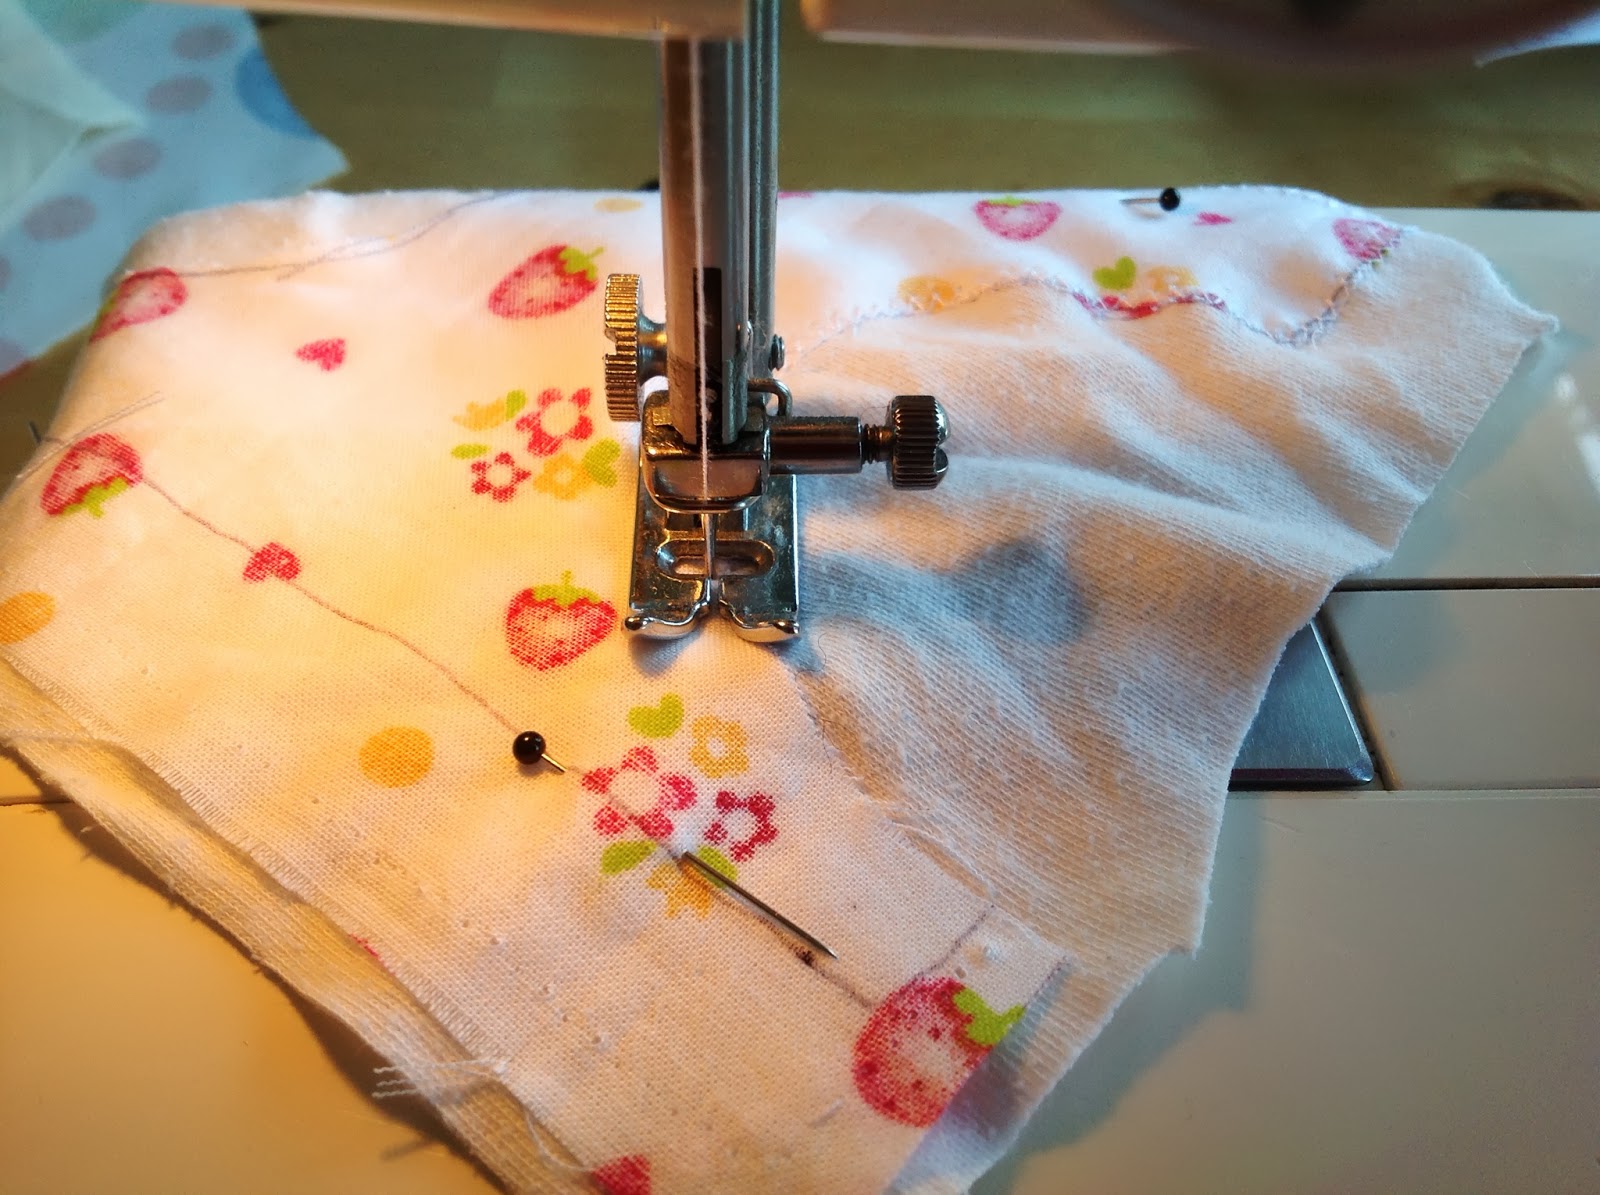


Cut the excess knitted fabric all around and turn the work inside out. Press and top stitch all around for a neater look, making sure you fold inwards the open end beforehand.


Sew a strip of Velcro (soft half) on the front, at the narrower end of the nappy (this will be the front of your nappy) as illustrated.


Then sew two small squares of Velcro (rough half) internally, at both ends of the wider side, as illustrated.


And that's it!!! How easy was that???

Happy playing! :)


Wednesday, 31 July 2013

A new career in baby carriers?

Oh my poor neglected blog friends!!!!
How could I just not write for...well, three months!!!
where has my life gone???
If I think about it, May and June are always an incredibly busy time for me (due to Little Monkey's & friends' birthdays...) but this year it has been double busy...because I've started to think seriously about setting up my own small business of natural bodycare products, handmade toys, and baby carriers...things that I make anyway for myself and my family, that I am passionate about and that reflect the way I want to live...a way that is more in tune with nature (in spite of having a real problem with wasting time on my iPad...not very natural, is it!).

Proud of my new business cards!
So, in the past three months I've made prototypes, using lots of generous resources on the Internet, and giving it my own twist, to ensure I can produce quality, handmade products for those that would rather support a part-time micro-business run by a mum than a multi-national...

But today let me tell you about baby carriers, because this is the one thing I believe in that truly changed my life as a mum, for the better.

Carrying your baby in a fabric support is not new, obviously, it has always been done and many cultures still do it as a normal way of life.

Courtesy of National Geographic
 
The Western world, though, is less accustomed to the "high contact" and only a few today "wear" their babies; is this because manufacturers of baby products  push you hard to think you need the most expensive type of stroller, or because society tells you that "if you carry him  all the time, he's going to grow up spoilt" (there are plenty of studies demonstrating that in fact carrying a baby regulates his breathing and heartrate, and it's just what nature wants him to do, just like it happens in all the other mammals...until the little ones can be independent).
I learnt in the last three year (since I had my little one) that babywearing has so many advantages that it just seems  the thing to do! From the convenience and ease of use of baby carriers (you have hands and arms again, and no staircase can stop you now!), to promoting physical development of the baby, to improving mother-baby communication and even encouraging milk production, there are lots of reasons to wear your baby.
Check out Babywearing UK and The Natural Child for a full list of benefits and to know more.

If you have been following me since the beginning, you'll know that I started making baby carriers for my Little Monkey some time ago, the first being a Mei Tai based on a pattern I found on the Internet (here you can find my original blog post...), followed by a mini-Mei Tai for her doll (here), until I came across different kinds of baby carriers (ring slings, pouch slings...WOW, the world of babywearing is huge! endless possibilities according to the situation, the age of the child...).
I also realised that I wanted my Mei Tai to be different, to have wider supports on the shoulders, a wider belly support, a pocket to keep small items while on the go...to cut a long story short, I was ready to start making my own prototypes, based on the invaluable lessons learnt through experience and the numerous (and generous) resources found on the net. 

Pouch sling for a dear friend who had never used a baby carrier before...
Gorgeous Joel Dewbury fabric from the Notting Hill collection (http://www.sewscrumptious.co.uk), featured in this light twill ring sling


Me and Little Monkey demonstrating my Mei Tai prototype...how cool is the animation!!!
Friends and family have started asking me to make baby carriers for them, so this is what I have been doing in the last few months, working also on the look (they need to be pretty accessories, not just utility objects, don't they?!), and I have tons of new ideas that I can't wait to experiment...
So watch this space, because I am close to finish a website, and to show you more pretty things that are boiling in my witch's cauldron...
In the meantime, happy babywearing, and enjoy the rest of your summer!

Tuesday, 23 April 2013

Spring is here! A flowery brooch to celebrate

My little monkey's key worker (so they call the girl who looks after her at Pre-school...at my time it was "the Teacher") is moving to pastures new. Nothing special there, a part from the fact that my motherly anxiety has kicked in...it is already difficult to leave your child with somebody that is not family for 8 hours a day...then you realise pre-school staff are also human beings, and that actually that is a JOB for them...but I really liked and trusted this girl! so the penny dropped this week, which is the last one at little monkey's pre-school for this sweet girl, who has been truly amazing in the last year and a half and a reference point for my daughter.
I have been thinking about her leaving present since when it was announced she was leaving, and I even bought the fabric to make her a little purse...until I decided to make a flowery necklace for her, which in the end became a brooch ;) - by the way, am I the only one who changes her mind one million times before finally sitting at the sewing table? Sometimes I feel like I'm going to the cinema and I'm not quite sure which movie I want to watch...that same excitement that precedes something good...
Anyway, cutting a long story short, this is the brooch I made for Chelsey this week:
I got inspired by some beautiful hand felted and fabric jewellery I found online. And for the first time, I hand-felted a few little balls of wool. It was surprisingly easy and quick (a couple of minutes per ball) and I just followed one of the many tutorials there are on the web. Check this tutorial out, for example.
I also used sheet of craft felt, various fabric scraps and a button. I started with the polka dot fabric rose, just rolling a stripe of folded fabric on itself to make it look like a rose bud, and fixing it with a couple of stitches when I was happy with the result. But again, if you want a more precise result, there are lots of tutorials on the Internet for fabric roses (this one for example). I then laid and twisted a few felt and fabric circles next to the rose, as a sort of calla lilly and added a felt ball at the centre. I repeated the same with a different scrap of fabric and felt and added a button and a machine finished leaf to the lot.
All finally stitched to a piece of felt on which I attached a brooch pin. This flowery brooch is hand stitched a part from the leaf.
I hope Chelsey will enjoy her flowery brooch, which I hope will remind her of my little monkey and will probably sit pretty on a bag or a coat...and good luck to her for her next adventure!

Saturday, 16 March 2013

Easy DIY monkey costume for last minute dressing up!

So, I was blogging a few days ago about the dilemma around World Book Day and nursery dressing up as book characters (yes, I know I should go out more!).
This year Little Monkey chose her costume for the first time (sob sob! she is not a baby anymore!), so she picked "MONKEY" in line with her favourite book of the moment: "Monkey Puzzle" by the authors of the Gruffalo.
The usual quest on Pinterest (did the world exist before Pinterest?!), and the fantastic and rich creative community came to help. A quick and easy monkey costume made using a brown hoodie and some felt...this is what I needed! Using a brown hoodie a friend gave me, and some brown and pink felt, it took me only a couple of hours to put together a really simple, but cute, costume.
The felt was used to cut out the ears (pink at the front and brown at the back), the tummy, and a tail. I then stuffed and sewed the ears to the side of the hood by hand; the tummy shape was drawn by using a plate to have a perfect circle on the pink felt, which was then cut in half and sewn by machine on the hoodie; and the tail was a simple, long rectangle of brown felt, folded in two and sewn along the longer dimension, then to the back of the hoodie.
And here is the monkey in action...
But being me at the moment, with lots of things to do and running around all day, I thought World Book Day was on Friday the 8th...turns out it was the day before! So, poor my little one arrived at nursery WITHOUT a costume, when all the other children were dressed up...and went to nursery the day after WITH her monkey costume, the only one dressed up....ehm ehm, I hope I didn't emotionally scar my child for life!
For more simple ideas on dressing up, have a look at my post on Children Dressing Up Fun. I would love to see your creations too!

Sunday, 3 March 2013

Dressing up fun...children costumes

World book day is approaching again (8th of March, this year)...at Little Miss' nursery they always organise a party with the children dressed up as their favourite book character. I find it VERY difficult to come up with something that respond to the multiple challenges of:
1) Being as comfortable as possible: you can't possibly cover your child in fur, no matter the season - although you can see plenty of examples on the Internet of poor little things wrapped in heavy, way too warm costumes...probably getting steamed in there! or perhaps all living in Alaska?!
2) Looks: it needs to be recognisable, or the child won't see the point of wearing it
3) Relatively easy to make - I'm alright with crafty stuff, but as soon as it comes to clothing, I've pretty much got no idea...
However, have a look at these three simple costume I made in the last 12 months...

VERY HUNGRY CATERPILLAR COSTUME
Last year I made a Very Hungry Caterpillar costume (see my post here), which all in all came quite nice, mixing some basic crocheting and some basic sewing.


HONEY BEE COSTUME
A few months before that, I made a bee costume, which is really as easy as it gets (not sure about famous books with bees in them, though!? but worth keeping this in mind if you are running out of time).
All you need is a yellow or orange top (I have had to dye a white top, as couldn't find any yellow ones in the shops), some black or brown leggings, and black fabric (I've used corduroy) to make the stripes and the sting at the back, which I then stuffed with a cushion's stuffing. I found in a high street accessories' shop a lovely set of bee wings and antennae that helped making this very simple costume the winner of the nursery competition!


OWL COSTUME WITH WINGS AND MASK
How about dressing up as the owl in the Gruffalo? or Winnie the Pooh? I found this sweet idea in a blog called Llevo el Invierno, written in Spanish and English. Here you can find the instruction for the wings, pretty simple to make and assemble (no hems required, hurrah!), if only a little time consuming. I didn't attach the wings to my child's neck, though, I instead added two loops so that she can wear them like a rucksack on her shoulders.
To complete the costume, I made a little felt mask (I found a nice tutorial in a blog called Petit Poulou). My personal invention in the mask making was using an elastic band with a little spring stopper (taken from an old jacket - see pics below) to regulate it. This way, I hope, the mask can be adjusted more easily and last for longer.


But since I call her my Little Monkey...can you guess what this year's costume will be?! ;)

Sunday, 17 February 2013

Homemade lotion bar and travel pouch

Since I started making my own body care products a few months ago, I made all I could find on the Internet that would use at least one of my magic three ingredients: Shea butter, coconut oil and sodium bicarbonate. I've made wonderful solid deodorant, whipped body butter, face cream, lip balm, shampoo, and lotion bars. The last one being the one I was less happy about, but the one I was most willing to get right. How wonderful it is, to be carrying around your very own customised moisturiser, that has no packaging, no nasty chemicals, no wastage, and most importantly, is really effective?
So in my post from a few months ago on bodycare homemade natural products, I gave the link to a recipe that, in hindsight, it may not be the best one, as it contains too much beeswax, and as a consequence, it doesn't melt that easily. I since found another recipe, same simple ingredients (coconut oil, Shea butter, beeswax, Vitamin E and essential oils), slightly different proportions ("the devil is in the details" someone said...), which was only published recently on the Health Impact News Daily online (you can find it here).
This is just *AMAZING*, so much so that I have given a few bars to friends as a present in the last couple of days and I have already received orders for more! I keep one in my bag at all times, and my hands have never been this soft.
But after giving the first bars wrapped in supermarkets bags or freezer bags (so very classy, I know!), I decided that I ought to give them away in a proper little travel pouch, that wouldn't be affected by the grease of the oils, and would be prettier than a supermarket bag...so I came up with this:
Ordinary oilcloth inside, cotton outside, and a cute little button to keep it closed. Oh, and my NEW LABEL! (Have you noticed it? Really chaffed by the way it came out, and how it makes my stuff all of a sudden look more professional!)
Cute little useful present, good to make hands, bodies, hair and pregnant bellies baby-soft!
Until the next one, have a great week!

March 2013 UPDATE! if you can't be bothered  to make lotion bars and want to buy my handmade lotion bars, you can visit my Etsy shop: http://www.etsy.com/shop/CraftyVirtage - if you can't find what you are looking for, please contact me and I'll try and help :)

Thursday, 31 January 2013

More upcycling: Mr Tango the Sock Monkey

Still on the theme of toys made with simple household materials, let me introduce you to a new friend for my (not so) little sister...Mr Tango, the sock monkey!
I pinned the sock monkey tutorial ages ago, but never made any sock monkeys because for some reason I didn't think they were cute enough for toddlers to be interested in them. Wrong, obviously. You should have seen my Little Miss playing with the body BEFORE I added ears, eyes and mouth...she was basically playing with a stuffed sock with legs...but, for once, the finished toy didn't end up in kids' hands. Instead, Mr Tango bravely flew a few thousands miles today to reach my little sis as a birthday present. :)
If you want to make your own sock monkey, good, step-by-step instructions can be found on Craft Passion's blog here.
This is a fun, one-evening project that can be easily done with used or new socks (I used new, Pound Shop socks, simply because my husband's socks are all block coloured and I was looking for stripy ones). I had fun deciding the expression of the monkey, all really down to the eyes, so I suggest you try a few eye types / styles (buttons, felt, big round, small embroidered...) and experiment a bit, until you are happy with it.
I also added a touch of femininity with the scarf, made out of a piece of particularly fancy ribbon. Another slight change from the tutorial I followed was not stuffing the tail; I just couldn't face stitching along the whole length of the tail and then turning the tail inside out...I think it turned out pretty sweet anyway.
Happy birthday Cele, love you loads... I know you'll make Mr Tango happy! X

Monday, 21 January 2013

Earphone tidy and cosy...how to solve the tangled wire issue

Dear friends, isn't it wonderful when outside it is snowing and you are on the sofa, ready for guiltless rubbish TV?? What happens when, instead, your TV only shows you THREE channels, sort of 1950 style, due to lack of signal in your area and the most interesting programme of the lot is a snooker match??? What do you do? Well, in my case, I came up with a earphone tidy and cosy! Since I made my iPad cover (yes, I know, I still have to write to you about it...), the "tangle earphone wire" issue has been bothering me big time. I failed to think about a closure to the back pocket of my iPad, so the earphones, which I keep there, often fall in my bag and become a mess in no time.
So tonight, while a very exciting snooker match was shown on TV, I took all my scraps of felt and started thinking how to make an earphone tidy and cosy. I was inspired by this little rabbit tidy, but sort of made my own along the way.
So here it is, my earphone tidy and cosy. It looks a little like Little Red Riding Hood to me...

If you want to make one, you'll need:
  • The free template I have made for you (not for commercial use please!)
  • Scraps of felt; I have used red for the outer and yellow for the inner part, pink for the hair, white for the face and blue for the heart appliqué
  • A little piece of sturdy but flexible material; I found the perfect material in a plastic disposable bowl. Or you could use some cardboard
  • Thread to match
  • Pinking shears
  • A pair of snap fasteners (or Velcro)
  • All purpose glue


First, cut two hearts out of felt using your pinking shears, one out the red piece, one out of the yellow.
Then cut the plastic bowl; shape it to make the inner support part of the earphone cosy using the template.
Cut the hole in the red (outer) heart through which the face will show.
Cut the face out of white felt; this will be slightly larger than the hole to allow it to be sewn at the back.
Sew by hand the white circle to the red heart; I used a simple running stitch.
Now have fun embroidering the eyes and mouth of Little Red Riding Hood...
Cut and stitch the heart appliqué (or any other appliqué you like...) on the front of the earphone cosy, and the hair. For the heart I've used blanket stitching, for the hair I have used again running stitching.
Now place the two snap fasteners on the yellow (inner) part of the cosy, so that they can snap easily leaving space for the earphone wire in the middle. Stitch them to the felt.
Glue the plastic support to the back of the red heart, centring it so that some space is left all around to stitch the outer and inner felt parts together.
Then glue the support to the yellow (inner) part.
Now stitch all around the felt to secure the two pieces together, using a running stitch.
And that is it! I hope you have enjoyed my first tutorial with template; and if you make an earphone tidy and cosy, it would be great if you could post a picture of it on my Facebook page: www.facebook.com/virtagegetscrafty... and don't forget to like it! ;)