Showing posts with label upcycling. Show all posts

Wednesday, 21 August 2013

Doll nappy / diaper #2...quick 'n' easy project

So, you may remember that last year I blogged about a teeny weeny nappy (or diaper) for dolls...
As time goes by, I am acquiring a bit more experience with the sewing machine (as it is obvious) but also, I'm cutting corners to make the little time I have go a little further.
So, here it is a quicker and easier version of my tutorial to make a doll nappy.

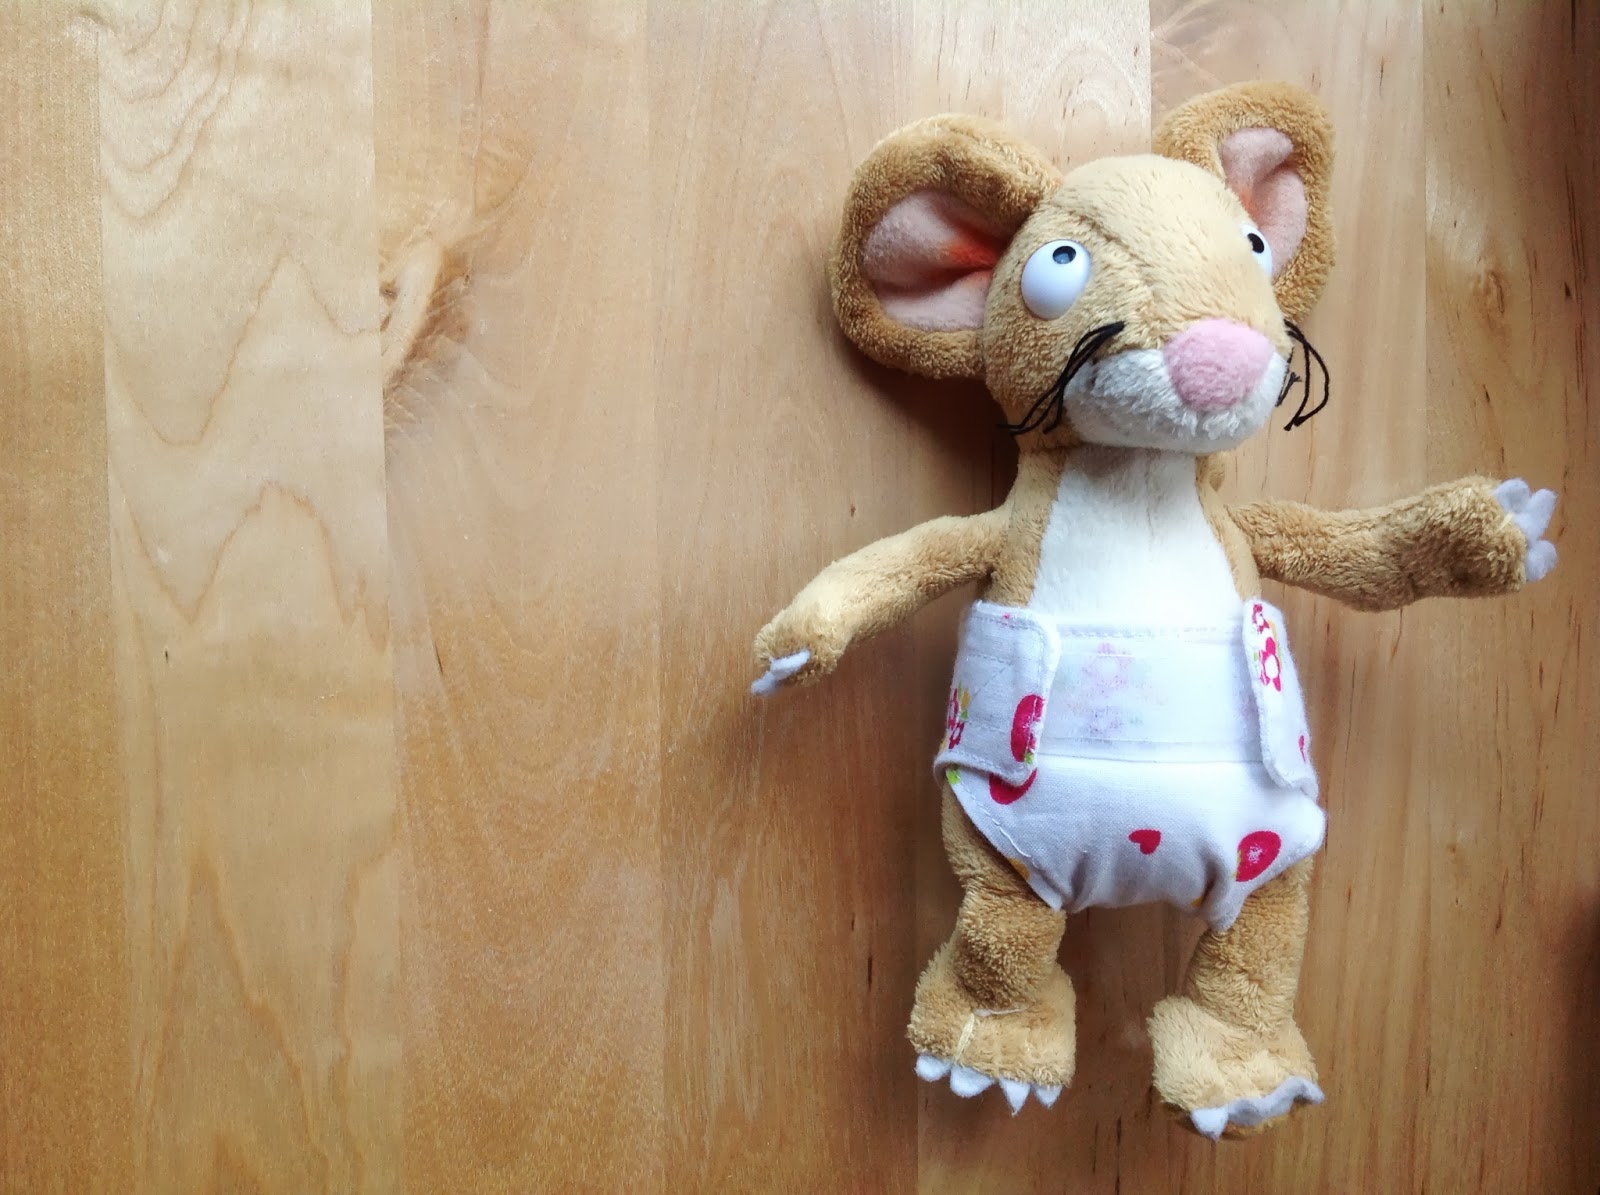
Who would have said that the brave little mouse needed a nappy????


These are the materials you'll need, slightly different from my previous tutorial :

Materials:
  • Old small bath towel (or a small piece of knitted fabric, easier to work with and less bulkier than towel. I've used an old baby bodysuit) - for the internal part of the nappy
  • A little cotton fabric of your choice - for the external part of the nappy
  • A strip of Velcro, 1 and a 1/2 time the length of the wider end of the nappy
  • a doll / teddy to put it on (please note: I based this on one of Little Miss' doll, which is long 26 cm head to toe and has a 22 cm waistline; if your doll / teddy is bigger / smaller you'll need to scale the measurements given to suit)
Follow the instruction in my previous tutorial to measure and cut yourself a paper template, according to your doll's size.

Cut the cotton fabric (for the external part of the nappy) following the paper template you have made.

Now, the easy bit: cut roughly a square of the knitted fabric, a bit bigger than the cotton fabric piece. Lay the cotton fabric on top of the knitted fabric WRONG sides together. Pin in place.


Sew the two piece of fabric together following the shape of the cotton fabric, using a zig-zag stitch (that would allow some elasticity and stretch to the nappy), leaving one of the short sides open for turning inside out.


Cut the excess knitted fabric all around and turn the work inside out. Press and top stitch all around for a neater look, making sure you fold inwards the open end beforehand.


Sew a strip of Velcro (soft half) on the front, at the narrower end of the nappy (this will be the front of your nappy) as illustrated.


Then sew two small squares of Velcro (rough half) internally, at both ends of the wider side, as illustrated.


And that's it!!! How easy was that???

Happy playing! :)


Thursday, 31 January 2013

More upcycling: Mr Tango the Sock Monkey

Still on the theme of toys made with simple household materials, let me introduce you to a new friend for my (not so) little sister...Mr Tango, the sock monkey!
I pinned the sock monkey tutorial ages ago, but never made any sock monkeys because for some reason I didn't think they were cute enough for toddlers to be interested in them. Wrong, obviously. You should have seen my Little Miss playing with the body BEFORE I added ears, eyes and mouth...she was basically playing with a stuffed sock with legs...but, for once, the finished toy didn't end up in kids' hands. Instead, Mr Tango bravely flew a few thousands miles today to reach my little sis as a birthday present. :)
If you want to make your own sock monkey, good, step-by-step instructions can be found on Craft Passion's blog here.
This is a fun, one-evening project that can be easily done with used or new socks (I used new, Pound Shop socks, simply because my husband's socks are all block coloured and I was looking for stripy ones). I had fun deciding the expression of the monkey, all really down to the eyes, so I suggest you try a few eye types / styles (buttons, felt, big round, small embroidered...) and experiment a bit, until you are happy with it.
I also added a touch of femininity with the scarf, made out of a piece of particularly fancy ribbon. Another slight change from the tutorial I followed was not stuffing the tail; I just couldn't face stitching along the whole length of the tail and then turning the tail inside out...I think it turned out pretty sweet anyway.
Happy birthday Cele, love you loads... I know you'll make Mr Tango happy! X

Tuesday, 20 November 2012

How to make a soft octopus out of an old glove: upcycling while watching TV

I really couldn't resist today, I had to post immediately about my little un-winding activity from last night: making a little soft octupus from an old glove!


We will be moving to a bigger house next week, so this week is all about packing and decluttering (and working 9 to 5, of course).
Yesterday was my wardrobe's turn to be emptied and decluttered. Mountains of old woolly hats and gloves and scarves attacked me as soon as I opened the door...half of them ended up in the charity shop bag as I haven't worn them for so long (can you picture me with a pink, sparkly scarf? Brrr...me neither), but while I was closing the bag I noticed a spare, holed wool glove...mmmm...the eco-warrior in me rebelled...and a lightning bolt of an idea hit me (well, almost...)!
Anyway, I sat on the sofa in front of the telly (you can see the glare from it below) and placed next to me my sewing box.


I started stuffing the glove's fingers with stuffing stuff :) - from a cushion's interior material
(Yes, I'm wearing yellow Crocs, so what?!)


With stuffed fingers, it was easier to mend the holes (there were a few of them)
 

Once the fingers were mended and firmly stuffed, I started sewing right at the top of the fingers, all around the glove, with the purpose of narrowing the "neck" of the octopus. The fingers are its tentacles.


It's important to try and sew the thumb at the same level as the other fingers (as illustrated below), so there won't be difference between arms, when the octopus is finished.


Then I simply pulled the thread at both ends, made a knot and stitched a few more times across to secure the "neck".


A bit more stuffing...A LOT more, actually, to make a round, firm octopus head


I sewed around the base of the glove (at the wrist), then pulled and knotted the thread to close the head.

 
Ta-dah! it does look like an octopus, doesn't it? But let's make it cuter...
 
 
Using some felt, I cut white circles (and blue coloured for the pupils) and hand-sewed the eyes on the head.
 
 
...and the extra fancy bit: I applied a felt star I previously made by dry felting
(a technique I've just learnt, using felted wool and cookie cutters as forms - really liberating activity, with all that furious pricking the felt with a needle!), but you can use normal felt or any other decoration/material that tickles your fancy
 
 
What about some buttons (just a bunch of old, mismatched ones did the job) as tentacles' suction cups?
 
 
And there it is, a cute little octupus ready to be played with (...after Christmas Eve, that is!)


Friday, 16 November 2012

How to upcycle a canvas bag

If you, like me, have a day job (that's why my posts are unfortunately a little rare these days...), you may also go to conferences and exhibitions. Even if you don't have a job, you may anyway go to places where now the "eco-gadget" of choice is...a canvas bag.
I found at home at least 10, and more in my office...I work in the environmental industry, so you would expect us to have LOTS of canvas bags laying around...
So, how to upcycle these bags and make them prettier - since they usually have branding printed on the front, and they are not very pretty?


This what how I have done it.

1. I wanted to cover completely the printed branding on the front of the bag, so I've chosen enough fabric scraps to make a panel to stitch on it, some applique' birdies, and some ribbon for decoration.


2. I cut the background fabric to the same size of the front of the bag, plus hemline. I then chose and cut the other contrasting fabrics to add to it. I pressed the hemlines (speeding up the process to make a clean hem without basting...) all around. I chose the fabric for the applique' birdies, cut the outline shape (you can find the original idea and pattern for the birdies in the delicious Country Kitty's blog here), and pinned them on the main panel.


3. I then applied the birdies to the main panel, using a very dense zig-zag for the main body, and a loose regular stitch for the wings, beaks and legs. My mum helped making the birdies' eyes by hand-stitching french knots on them. Finally, I stitched the ribbon and block-coloured panel to the main panel.


4. After my failed attempt to stitch the work on the bag by machine (I haven't got the right machine to reach the bottom of the bag with ease), my mum very sweetly offered to hand-stitch it (what would I do without my mum...???)


...and that's it, really!

The bag has now been given as a present to my little sister who is using it as a lunch bag.

If I survive this end of year madness (including work over-load, moving house and pre-Christmas frenzy) I'll make more of those as little presents...they are so sweet, aren't they?

Thursday, 6 September 2012

Another quick project: upcycling an old vest

This old white vest of mine was crying for the bin...it really was, however it is made of a nice sturdy cotton and I use it all the time for doing yoga.
So, I couldn't really throw it away...how about upcycling it?
Sometime ago I had bought a set of 10 fabric paint pens at the Pound Shop thinking they must have been of the dodgiest type, however for some crafty jobs they could be just right. In fact, to my surprise, the colours turned out pretty nice.
At the bank holiday weekend, while Little Monkey was covering herself with watercolours, I thought I'd give a go at upcycling my vest, carefully covering all its tough stains with a hand-painted blue and purple flower.
This is the result:

 
And this is me, all stiff, strangely leaning to one side and wearing a sporty vest with some office trousers: so classy! *irony*...sorry for the terrible picture, but I hope it gives the idea...not too bad for a half hour job, uh?!