Pages

Sunday, 27 May 2012

Summer project #2: Isabelle's Rag Doll -" a sort of" tutorial

You may have noticed I haven't been around that much in the last few days...partly because the weather has finally turned nice, and so we have spent lots of time outdoor enjoying this precious (and rare) opportunity; but also because, as said in my previous post, I have LOTS to do, with all the birthdays coming up and Little Miss' party...
The first birthday of the season was Isabelle's (happy birthday, cutie!), and this is what I made for her:

The inspiration with this doll was provided by the incredibly cute and neat dolls PinkNounou makes, I fell in love with them straightaway when I found them on the Internet! This is my own version, and although I have used for the basic doll-making Miss Gioia's tutorial, I have modified it considerably, especially in the embellishments.

I have used fabric I had at home, trying to match the colours. For the doll's body, I have used a white cotton fabric. For the hair, I have used felt. I also embroidered the face features and the letter "I" on the doll's tummy, so if you want to make this doll, you'll need some embroidery thread as well as the standard one.
Here it is step by step what I did:


First of all, I have sketched what I wanted the doll to look like.
I then transferred the main body parts to the white cotton fabric, following the instructions of Miss Gioia's blog.


I then cut the pieces TWICE, leaving some allowance for the seam. Later in the project, I decided to make the legs in a different fabric, as if she was wearing tights...Next time I might also do the body that way, as if she is wearing a colourful top.


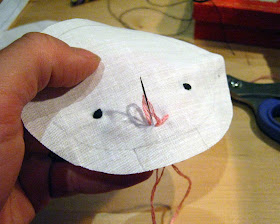
I embroidered the facial features, using padded stem stitching, starting from the eyes. I wanted her to have a sweet, if not a little bit sad, expression...


Then, I embroidered the mouth, using simple chain stitching.


Once the face was finished, I have marked the letter I wanted to embroider on the doll's tummy, like a little tattoo. Remember Toys Story, and the toys marked by the child with his own name? I wanted to make this doll unique and also wanted to make sure the younger sister of this child doesn't claim it as hers one day!


...and this is the letter, embroidered with a double-coloured thread.


Following the tutorial, I sewed the head and body, front and back, as pictured.


As said earlier, at one point I decided to have the legs made in a different fabric. Once cut, I sewed them and the arms, right sides facing, all around, leaving the upper part open for turning and stuffing.
I then (with quite a bit of effort given the width of the limbs!) turned legs and arms inside out, stuffed them firmly and set them aside.


The hair now: I cut a felt bob for my little beauty to frame her face, and I left some seam allowance.


I then sewed some decorative curves on the front of the bob, and cut a little felt flower to apply on the air.
I then stitched the flower to the front of the bob, and cut off any excess thread from the decorative curves.
I sewed together the front and back of the bob, right sides facing. I then turned it inside out and put aside.


As per tutorial, I then basted the arms...


...and legs of the doll.


Next, I sewed together the front and back of the doll, right sides facing, from the left leg up and all around to the right leg. I left the bottom of the body open for turning and stuffing.


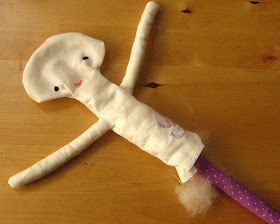
I then turned the doll inside out and started stuffing it. At this point it looked a little like E.T. and I wasn't sure how the final result would turn out, but I had faith and continued to stuff the doll!


I then stitched the bottom of the body and secured the legs.


The dress: I cut 2 trapezoidal shapes for a simple summer dress, and stitched a piece of ribbon at the bottom of the back. On the front, I have applied the ribbon to tie a bow as pictured .


Right sides facing, I sewed the two parts of the dress, stitching them together only up to the under arms. I had previously sewn the seam allowance of the upper parts of the dress on each side as pictured.


I put the dress on the doll, and hand-stitched the upper part of the dress to the neck of the doll, up to the arms, both on the front and on the back.


Lastly, I hand-stitched the hair to the head using blanket stitching from one side of the face to the other one.


This way, the dress is attached to the doll but can be lifted to show the pretty tattoo on her tummy!


I also wanted to wrap up my present nicely, so I came up with this final touch.


I hope you enjoyed my "sort of" tutorial, please show me your creations if you do make a similar doll!
Have a lovely week and enjoy the sunshine x

Sunday, 13 May 2012

Summer project #1: Sunbonnet

My baby was born in June 2010, and all of her friends were born around the same time.
That means that May, for me, the crusader of homemade, is never going to be easy. It started last year with a huge birthday party, and the handmade decorated cake. This year (that I am even more into crafts and eco-parenting) it's going to be Little Monkey's birthday party with party bags, cake, present and decorations, and all of her little friends' presents. Add to this that three of my very close friends are about to give birth to their new bundles of joy, and you will understand me if I feel slightly overwhelmed!
I know, I know, I'm shooting myself in the foot here: why don't I just pop in the local Tesco and BUY the cake? why don't I just buy plastic party bags and fill them with the usual 'Made in China' trinkets???
With all due respect to fellow mums, who are perhaps busier than I am, but go and buy things for their children's parties, I know I can MAKE nice stuff and I enjoy it too, plus I want to believe that things can be done differently, in a less consumerist way and with a little more love.
I just ADORE handmade stuff, and I hope this adoration shows through the things I make.
So, here it is the first product of my craft summer series: the sunbonnet.


Remember that sometimes ago I bought some vintage patterns in a flea market? I often buy patterns and books for future use, and just as often I don't have the time to make anything with them. But this time I decided to make something using the 1980's children hat patterns by Simplicity.
I love sunbonnets, perhaps because when I was little I loved Sarah Kay, that sweet little girl with huge sunbonnets and 1970s flared trousers (well, it was the 1970s...).
I also recently came across this Peekaboo Bonnet by Made by Rae, which is incredibly cute and neat.
So no question I had to make sooner or later a sunbonnet for my baby girl and perhaps for one of her friends as a birthday present, but I thought I should start with something slightly simpler. The Simplicity pattern was just what I needed. So I went for it and in a couple of hours I had this cute result. I also learnt to use bias tape on a curve, which was easier than I thought using my steam iron.

 
Doesn't my little one look cute in it? But if I have to be perfectly honest, the full truth is that I actually made this hat for one of Little Monkey's friends, whose second birthday is in a couple of weeks time...but I made up a tonne of excuses to myself and couldn't give it away! well, this means I just have to make something else for Little I now :)

Come on, summer, bring it on!!!


Monday, 7 May 2012

Crafting with kids: homemade playdough

What do you do on a Bank Holiday weekend when outside the weather is miserable (in spite of the calendar blatantly lying by telling me it's May)? How do you keep your toddler entertained?
This morning, to answer these scary questions I thought: let's play with playdough!
I had bought a few months ago a tub of playdough, that Little Miss has played with perhaps  three or four times. I opened the tub this morning and the dough was rock hard. Mmmm...
I vaguely remembered seeing on Pinterest a website with homemade playdough recipes, so I quickly looked it up and there it was, a whole website full!
Playdoughrecipe.org has a variety of recipes from peanut butter to pumpkin pie dough, from glittery to chocolate dough but also the classic recipe that is natural enough for kids to play safely with, but doesn't smell too good (just in case they find it yummy!) or involve complex operations. You can find the recipe here.


The very basic cupboard ingredients (flour, cream of tartar, cooking oil, food colouring, salt, water) make it a super cheap, easy and fun project to do.
I involved Little Monkey in the preparation, asking her to mix the ingredients in a big bowl. I then put the mixture on the fire, which after briefly boiling, soon bunched up in a big ball.


I let it cool down away form the fire for a few minutes, then kneaded it a bit, and there it was, wonderfully soft and ready to play with. Best of all, if the dough is kept in an air-tight container in the fridge, it will last for a year!
My little one is almost two and, like any toddler, difficult to sit still for more than a few minutes: I am not exaggerating, she sat down playing with the dough for one and a half hours...we used cookie cutters and pens and any other everyday object we could find to give shape to the playdough, including making a mini-pizza in true Italian style!


Another plus of this easy craft project is that, by following the recipe's quantities, I ended up with lots of dough, which I divided in small food containers, ready to give as presents to Little Monkey's friends.
Can't think of any other craft project easier and more fun than this!


Sunday, 6 May 2012

Super practical travel baby chair

When Little Monkey was a little more...little, and I was enjoying my maternity leave (thoroughly) by going out  for coffee with my fellow mums, 4 or 5 of us used to gather pretty much every afternoon to gossip and share our baby stories. We would usually go to a little independent cafe, and the place regularly would became a total mess of baby biscuits, empty cartons of formula milk, boobies in full view and screaming babies for the delight of other customers. Too much for the management of the place, also because it soon become apparent how many cafes just didn't have enough highchairs, and we all wished we could carry a little baby chair in our pockets.
Well, one day I was shopping and saw a pocket highchair by JoJo Maman Bébé which seemed to me just the perfect thing, but too expensive to buy and too easy to make. So I thought: I can do it!

I wanted to make it really resistant so I bought some pretty sturdy upholstery fabric to make the interior of my travel chair; I already had a Winnie the Pooh cotton fabric, and thought that it would look quite cute on the outside.
To cut the pattern, I took the measurements from my kitchen chairs, however I ended up modifying the design from what you see on the pictures, as the travel chair wouldn't adapt to wider chairs.
I unpicked the stitches at the sides of the pocketed end that goes over the back of the chair, and inserted a wide elastic band between front and back at both ends of the pocket. That allowed a bit more flexibility to use the travel chair in places other than my kitchen. To improve safety I also added a couple of loops at the back to feed the straps through - again, the pictures show an early version.


After a few trials and errors, I ended up with a pretty good, sturdy travel chair, comfortable but strong enough to resist a big baby's antics. When finished, the travel chair can be folded inside the pocketed end, and becomes really small, so super practical to carry in a bag or in the pushchair.
That was the perfect gadget to have with us when we were travelling to Italy on holidays, you can see how Little Monkey couldn't be happier (goodness me, she was so little in these pics!).